Sunday, October 30, 2011

The One Pumpkin


The One Pumpkin by light.

Forging The One Pumpkin


You can find a high resolution graphic of the inscription on Wikipedia.  If you want one for your very own, this can be scaled to fit your chosen pumpkin.  Use a sharp craft knife and set aside an hour or two for carving.

Happy Halloween!

Monday, October 24, 2011

My Kingdom for a Spoon

Somehow I have less spoons than are necessary. I would buy matching spoons but, chances are, I will only be able to buy them in a new set so it seems silly. Instead, I'm going to troll thrift stores and any yard sales that are still operating at this time of year to accumulate a collection of mismatched cutlery. Then, when silverware disappears, as seems to happen around here, I won't have to buy a whole set to replace it.  I can simply buy the next fork or spoon I come across. Bring it on Goodwill!!  I will have my spoons. Yes, I will.

Monday, September 26, 2011

Eyeball Cookies


These little eyeball cookies taste as good as they look and they're looking right at you!  They come together quickly and are a great way to impress your Halloween guests.

Ingredients
1 cup salted butter, softened (use real butter or at least half real butter)
1/2 cup powdered sugar
1 teas vanilla
2 1/4 cup all-purpose flour
red gel or powdered food coloring
2 Tbsp vodka
fine paint brush
green candy melts (I added a little bit of brown to make the irises muddy)
small piping bag
chocolate chips


Preheat the oven to 400 degrees.

Cream together the butter and powdered sugar, blend-in the vanilla.  Add the flour and combine until the dough is smooth and uniform.

Roll walnut sized balls and place 1 inch apart on ungreased cookie sheets.

Combine the vodka with enough red food coloring to give it a nice dark tint.  Use the paint brush to add random lines to make the eye look bloodshot.  The very top of the cookie will be covered so start brushstrokes there and drag the coloring down the sides, tapering down the lines and making branches wherever possible.

Bake 9-10 minutes.

Remove and allow to cool.

Melt the green candy melts according to directions and pour into a piping bag.  Cut the tip off, leaving about a 1/4" wide opening.

Pipe an iris and when cool enough to touch it, press it down flat.  Then quickly add a chocolate chip.  Allow the chocolate to set.

Wednesday, September 21, 2011

You Are Not So Smart


I love You Are Not So Smart!  It's a fabulous look at the trappings of our human minds  I'm excited to read David McRaney's new book.  I feel like his writing is geared for the geeky among us who are not psychologists but who like to examine our lives, reality, and the universe of which we are a part.  As the mother of a child with Aspergers, understanding and examining our own behavior is part of daily life.  I have spent years trying to teach my kids how to function within the perplexing human condition that still confounds me on a daily basis.  It's great to have help.

Monday, September 19, 2011

Pirate Booty

Arrr!
Today is "International Talk Like A Pirate Day!"  In honor of the occassion, I made this copycat of a Tortuga Rum Cake.

My husband is very adept at pirate-speak.  It's practically a gift.  I've been hearing it, I've been called a saucy wench (which, in case you didn't know, seems to be a good thing), and I've cooked Caribbean food in honor of the day.  Now it's time for me to partake of the cake!

Tuesday, September 13, 2011

Creepy Eye-Following Pictures

I am decorating for Halloween!  My family room's theme is "Abandoned House" so I created some old-fashioned, creepy eye-following portraits for that room.  For full instructions and pictures, please visit my Instructables submission dedicated to the project.

Saturday, September 3, 2011

Make Your Own Write-On Wine Glass Tags

These little drink tags are simple to make and easily customizable.  I used a large circle cutter to cut outer circle but it can be hand-cut..  However, I recommend using a 3/4" - 1" circle punch to make the center hole.

For step-by-step instructions with photos, visit my Wine Glass Tags contribution on Instructables.

Thursday, September 1, 2011

Sauerkraut

I have never made sauerkraut and have never tasted the fresh stuff--just what's sold in jars in the supermarket.  What an easy thing to make!  I still have a long wait to try it but I hope it's worth it.  Because it's what I had on hand, I made mine from purple cabbage.  It occurs to me that this would make a lovely addition to my Halloween menu.

I have referred to the Basic Sauerkraut Recipe from Old Growth Yiddishkeit..

Monday, August 29, 2011

Making New Bottles Look Old

Left: New Bottle,  Right: Aged Bottle
As previously posted, I have been creating a number of potion bottles in different styles for my Halloween Potion Lab.  I want some of my bottles to look very old--like they have been sitting around for quite a while, collecting dust and getting grungy.  Since they will be used for decanting beverages, I want the the bottles to be food-safe.  Thrift store glass bottles are bad choices because I have no idea how they may have been used previously.  So I have been augmenting new bottles.


Rather than achieve an aged look with paint,  I tried to seasoned the outside of the bottles as I do cast iron cookware.  This experiment was very successful.  Seasoning cookware requires applying thin layers of oil and baking the cookware between the layers to create a hard, protective outer surface.


Caveat: There are products and techniques to paint on glass that require the glass to be heated to a temperature in excess of 300 degrees Fahrenheit.  This can be successfully done when proper care is taken to ensure that glass is not subjected to quick changes in temperature.  Be sure to start with undamaged glass--no cracks or chips please.  Be sure to place glass in a COOL oven, allowing the temperature of the glass to rise as the oven temperature rises.  Also make sure to turn off the oven with the glass inside, allowing it to cool as the oven cools.  Do not attempt to change the temperature of your glass quickly because that is how breakage happens.


I used flaxseed oil on my bottles because it is a "drying oil" which would give a hard finish while still being food safe.  It gave a yellowish sheen that was exactly what I had been looking for.  Since organic flaxseed oil is what I'm already using to season pans, I thought it was ideal.   My first experiment was with canola oil which gave the right sheen but was sticky.  So do yourself a favor and use a drying oil.  If you are simply aging bottles for display, you can use linseed oil instead.  To read a bit more about the chemistry of seasoning surfaces with oil, check out this post on Sheryl Canter's blog.


Before seasoning the bottles, I wiped down the clean bottles with rubbing alcohol and let them dry.  Next, I applied an extremely thin layer of my organic flaxseed oil to the outside of a clean dry bottles.  Then I wiped it off which left behind a very thin, almost imperceptible layer.  I placed the bottles on a foil-lined pan in a cool oven.  Then I turned the oven on to 350 degrees.  I baked them for about an hour and a half before turning off the oven and allowing the glass to cool down while inside the oven.  Once the bottles were cool, I repeated the process to build up a few layers.  It does take some time but the process was easy and the results were worth it.


Be aware that any pattern of oil streaks you leave on the glass will show.  Also, too thick of a layer will cause the hot oil to drip down the bottle, creating dark yellow droplets.  So make sure you create only the slightest haze on the surface when you wipe away the oil.  I experimented with several glass beer bottles in the pursuit of the right technique for applying the oil so you might consider some trial bottles before moving on to your favorite one.


The aged bottle pictured has three layers of oil.

Saturday, August 27, 2011

Shameless Self Promotion

My little cauldron place card holders have now been entered in the Instructables Play with Clay Challenge.  Please vote for them!  I made them for fun (and for party props) but discovered this open contest for polymer clay creations.  I call it kismet!

I have many more projects for your gotthic, Victorian, steampunk and/or Halloween pleasure coming up in the next few months.  So follow me and keep an eye on this blog.

Monday, August 22, 2011

Aged Book: Most Potente Potions

This year's Halloween party will feature a Potions Lab for brewing up some amazing potent potables.  I have a number of things that will be included but the most important thing is the book of signature drink--err, potion, recipes complete with pictures.


To create the book I started with this little photo album.  The ring binding is not ideal for a medieval look but it makes the book easier to assemble and add to over time.  There may be a potion brewing contest, involving the invention of drinks using our bar ingredients and I'll be putting the entries from this contest into the book for later years.


To age the vinyl book and help it look like ancient leather, I took the following steps:

  1. I conditioned it with baby oil, to relax it a little bit.  I don't know if this did any good but it didn't seem to hurt.
  2. I sanded it.  I tried to hide the direction of my sanding but it was somewhat difficult.  This was not a big deal though, as other steps helped hide it.
  3. I used a small grater and really roughed up the edges and raised surfaces.  This is what I would expect to happen in a very old leather tome.
  4. I used the smooth edge of a butter knife to make ripples in the fabric.  I just pulled it across with the knife angled a bit.  This also stretches the fabric a bit and creates some more rough parts.
  5. I kicked it around.  A lot.  We live in a slightly rural area so I kicked it and pushed it around on a gravel road.  This got it nice and dirty and helped cover the directional lines from my sanding by adding new random marks.
  6. I polished it with brown shoe polish.  This was darker than some of the fabric and filled in the cracks and creavases with what looks like filth.  It also stained some of the stitching.
  7. Stain it liberally.  I used some brown stain that I made by soaking coffee grounds in warm rum (what I had in the house).  I dripped, dabbed, and splattered that everywhere.  I added a little red and blue food coloring and repeated the process.
  8. I tea stained the inside and sealed it.
  9. I used permanent marker to ink the label.

Now I have it sitting out in the sun during warm days and, hopefully, it will fade all of my work a bit and add to the effects.

Thursday, August 18, 2011

Frank Kovak's Homemade Planetarium

Frank Kovak built a planetarium--an entire PLANETARIUM--with his own two hands, painting every star on the 4,000 pound globe that represents the night sky.  I am completely impressed that his fondness for the the stars would come to fruition in such an amazing way..  Read the NPR story here:  Homemade Planetarium Reflects One Man's Dream.

What big dream do you have?  There should always be something we all reach for.  For Frank Kovak, it's the stars.  What about you?

Monday, August 15, 2011

Cauldron Place Card Holders

These little cauldron place card holders are a fun Halloween decoration for spooky dinner parties.  They are made from polymer clay and can be customized with different colors of potion.  The cauldrons themselves can be made from a variety of metallic colors to match your theme.

To make each place card holder, you'll need:
  • Aluminum foil (about 4" off the roll)
  • Stiff wire -- I used 10 gauge copper wire but you can use floral stems
  • Needlenose Pliers
  • Wire Cutters
  • Polymer Clay in the color of your choice to be the "potion" -- about 1/8th of a 2oz block
  • Black Polymer Clay -- about 1/4th of a 2oz block
  • A thin pointy object such as the end of a small craft paint brush
  • A thin, smooth rod, such as a screwdriver, to wrap the wire around when creating your card holding loop

First, make a foil core.  It's possible to use polymer clay to serve as the core but I didn't want to waste clay.  Create the core by simply wadding up your foil into a ball.  Don't press it too tightly.  You want the ball to be about 1.25" across.  Then press the ball down on two sides to create a flattened disk.  The disk should be about 1/2" thick.  Poke a hole in the center of your disk.  You can use the end of your wire to do this but I used a toothpick.


Cut a 6" length of wire.  Using pliers, make a rough loop in one end and then bend the wire at a 90 degree angle to the loop.  This way, when the loop is laying flat on a surface, the wire is sticking straight up in the air.

Pull the straight length of wire through the hole so the loop acts as a stopper at the other end.

Roll your colored clay, about 1/8th of a 2 oz block of clay, into a ball.  Flatten it until it is about the diameter of your foil disk.  Pierce through the center of this clay with the end of the wire and pull the disk down over the foil. Smooth the edges of the clay down over the sides of the foil.
(It is possible to make the loops in the wire that will hold the card in this step instead of later.  See the last step for details.)

Bake this at the temperature and time specified by your brand of polymer clay, in a glass baking pan.  I line the bottom of my baking pan with paper.

Once this foil and clay creation has cooled, it's time to form the cauldron around it. Gather about 1/4th of a 2oz block of clay and roll it in your hands until it's soft and pliable.  Pinch off enough to make about a 1/2" ball of clay and set this aside.

Form the larger clump of clay into a ball and flatten it into a disk until it's about twice as wide as the foil disk.  Place the foil disk in the center and work it up and around the foil piece, as shown.  Pull the clay around the top and smooth the top edge.  Then press the clay to taper away from this edge and create the flared top of the cauldron.


Divide the rest of the remaining black clay into four equal sections.  Set one aside.  Roll each of the other three sections into a ball.  Place the balls on the bottom of the cauldron, evenly spaced, to serve as legs.  Then press the cauldron down, pushing in on the already hardened colored "potion" in the center of the cauldron, until it's level and the legs are pressed on well.

To create the handles on the sides, divide the remaining clay in two.  Roll each section into a ball and flatten slightly.  Press the end of a paintbrush or chopsitck into the the center of one disk and then, keeping the point in the clay, place it against the side of the cauldron and press the point in slightly to secure the handles.  Pull away the point.  Repeat to create a handle for the other side.


Tuesday, August 9, 2011

Bilge Water Bottle

This is a fairly simple bottle that I decorated.  I used a bottle, paint, dirt (yes, what you find in your garden), and some letter stickers to create this container which will hold whiskey at this year's Halloween party.  It's a 32oz Mississippi Mud Black & Tan beer bottle.  


First, I masked off the top section of the bottle.  Then, I applied letter stickers.  The goal was to use the stickers on the glass to mask off the letters, rather than keep them applied to the bottle.  The plan was to paint over these and then remove them to reveal the color and texture of the bottle.  The stickers I found were a perfect font so it didn't matter that they were glittery pink.  I used some of the leftovers to frame the label.  Once the letters were on, I coated it with a few layers of matte finish clear spray paint.  The paint sticks to the glass and, once dry, creates a "tooth" for acrylic paints.  It also seals any of the gaps between the stickers and the glass to prevent colored paint from bleeding under the stickers.  


Once this layer of paint was dry, I dabbed a few layers of beige acrylic craft paint over it.  When that was dry, I took it outside to a planter of beautiful dirt.  To create a textured, aged surface, I layered paint and dirt.  I sprayed sections of the bottle with the clear paint, tossed on some dirt, brushed off the excess and repeated until I had covered the whole bottle with uneven filth.  I sealed the top with clear polyurethane.


Finally, I used tiny sharp tweezers to pull off the stickers and reveal the label.

Wednesday, August 3, 2011

Everything Old is New Again

This was found inside a Hall and Oates album from around 1983.  I didn't have to google the album or even read the notes to know this, of course, because it is a calendar dated 1984.  Lucky for me, nobody had used it.  There is not so much as a "Baby's First Leg Warmers" notation in its 366 days.  1984, like 2012, was a leap year and the calendar location of each date in a leap year repeats every 28 years.  So. . . I have next year's calendar ready to go!

Tuesday, August 2, 2011

Pottermore: The Boons of a Sleepless Night

I could not sleep.  It was not because I wanted to register for Pottermore.  I simply lay awake hoping to get tired soon.  Just before 3am PST, I decided to stay up for a bit.  I remembered that Pottermore registrations were taking place in the middle of the night and, lo and behold, at 3am, it was the magical hour.  I put in my clue, found the quill and was in!

Sunday, July 31, 2011

Retro Futuristic Alien Antennae

My daughter insisted I use this shadowy photograph.
These alien antennae feature moving parabolic dishes which swing around as the wearer is grooving during Ludo's Summer Concert Tour, Space Dracula's Basketball Expo.

These space-themed accessories were built from polymer clay over bamboo skewers and attached to a headband.  I really enjoyed making them!  The hardest part were the parabolic dishes which I formed around the concave base of a shot glass which was liberally dusted with cornstarch.

I liked the idea of a retro futuristic scheme so I pulled the colors from 1950's cafes.

Thursday, July 28, 2011

LA to Honolulu Via Seattle

Do this to view the most interesting route:
‎1: Open Google Maps (directions)
2: Type Los Angeles as your starting point
3: Type Honolulu as your destination.
4: Read step 13

Thursday, July 21, 2011

Bag End Fairy Door

The fairies of Middle Earth should be right at home living behind this tiny version of the door to Bag End.  This door was made from polymer clay using a variety of techniques.

Friday, July 15, 2011

TARDIS Fairy Door: A Home for Fairy Time Lords

This fairy door, perfect for fairy Time Lords, is a mini replica of a TARDIS door.  It's just over 3.5" and made from polymer clay.  I spent far more time on this door than I had anticipated, building up layers, referring to photos, cutting pieces, carefully placing things, and just generally fiddling around with it.

I used liquid polymer clay to cover the tiny signs which were printed onto plain paper.  I simply dabbed the liquid on both sides of the paper, smoothed it out with my fingers, and cooked these briefly on baking parchment paper.  The smooth blue clay on the surface of the door itself was just a little too tidy so I brushed liquid polymer clay onto it to finish, creating striations with the bristles.

Friday, July 8, 2011

Vintage Console Stereo Revamp: So It Begins

My husband, the vinyl geek, has been searching for a console stereo for quite some time. He has hundreds of albums and wanted to be able to play them in a dedicated system. About 5 years ago, he acquired one that was in really rough shape and eventually decided against fixing it up, as almost every component needed replaced and the structure also needed some work.

After looking hard for a while, this is the one he finally found to fulfill his console dreams. Most of it works and the furniture itself is in really good shape. He has plans to hook-up a laptop, allowing our digital music to be played over the vintage speakers. We ended our Thursday with its delivery and the weekend is being planned around the beginning of its revamp.

 Here it is:

Monday, July 4, 2011

Happy 4th of July

Happy Independence Day America!

This little celebration cupcake is mock red velvet (I added about 2 Tbsp cocoa powder and a Tbsp or so of red food coloring gel to yellow cake mix), frosted with vivid blue icing and topped with white fondant stars.

Thursday, June 30, 2011

One Month Novel-Writing Challenge: Camp NaNoWriMo

I've participated in NaNoWriMo's 30-day novel-writing challenge for 3 three years now.  Every November it's a madcap sprint of words to reach the lofty goal of writing a 50,000 word rough draft in a month's time.

This summer NaNoWriMo introduces Camp NaNoWriMo.  While this is not a literal camp with cabins, critters, and a lake, creating a virtual camp atmosphere might make it more interesting.  Taking the laptop out to the deck and sitting under the lofty pines to write might just be the most inspirational writing setting available.  Even if it's a bedsheet tent in the livingroom, it's all a perfectly legitimate camp experience as far as the writers are concerned.

Interested?  This camp costs absolutely nothing, unless you want to donate a little to the organization, and boasts forums and other ways to support your noveling efforts.  November NaNo includes events such as write-ins.  If you are local, your local NaNo Municipal Liason may host such events for the summer.  Even so, the NaNoWriMo forums have ample opportunity for socialization, help with burning questions about plot, setting, character development, etc..  Consider signing up!

Tuesday, June 28, 2011

You Know You're a Geek When...

Elvish Elvis
You know you're a geek when you are in a coffee shop, Willie Nelson's "You're Always On My Mind" starts playing, and your husband says to you, "I always liked the Elvis version" but you heard: "I always liked the Elvish version."

Now I can't think of Elvis without imagining him being anything but Elvish.  Elvish Elvis, Elvish Elvis...

Thursday, June 23, 2011

Geek Love: RPG Comes to Life

A geek relationship is a funny thing.  My husband and I have been together for over 20 years and married for slightly less.  At first, I think we were kind of obsessed with each other--it's a geek thing.  We emerged into adulthood together and started dating while attending college.

We tended to intellectualize a lot of relationship concepts.  Again, this is common with geeks.  We weren't particularly smart about what we wanted or expected from each other and ourselves initially.  While we discussed social politics from time to time, we didn't turn everything into some psychological exposition of motives and backstory, or create formulas to determine our compatibility.  If we had, we would have crashed and burned.  Finding our common goals is something that happened over time.

We were not drawn together and repelled in the cycle of dramatic upheavals that I often see in young relationships.  Co-geeks tend to converge their interests, rather than combat each other.  That's for the MMORPG, thanks.  Sure, there were a few times, at first, when we each dug in our heels as we tested the waters.  We'd both been in previous relationships where a certain amount of manipulation had been at play and were both armed with some sense of self-preservation.  Before long, we realized that it was pretty stupid to always be on the defensive.  We loved each other and we enjoyed each other.  It was just a matter of wants and needs--something our generation grew up being told were the same thing, but which were not.  Once clarified, we found that our needs were identical and our wants were compatible.

The fact that we both gravitate toward those things which are absurd or silly, means we have fun having fun.  We especially like having fun together.  We agree politically and spiritually on most things and would not begrudge the other a contrary opinion.

Today, our relationship is about keeping things steady and sure, not testing each other or checking boundaries.  After all, there are no saving throws.  Like a boss fight, we are "all in"; there is no other way.  The emotional connectedness isn't the only--or even the primary--thing going on.  It's about teamwork.  We can't always be in 100% agreement so there are compromises to be made.  We share a lot of likes but we also share very similar dislikes which means the compromises have been relatively small.  We protect each other from their own pet peeves wherever possible, rather than focusing exclusively on ourselves.  If we both want the very best for the other person, our own backs are covered in a very non-self-centered way.  The foremost priority is the relationship.

Monday, June 20, 2011

Star Trek Love Song

My husband wrote me this Star Trek Love Song about ten years ago...

Across the convention, our eyes met and locked.
In the starbase of your love my heart was docked.
Your full, pouty lips, your green, pointy ears;
There's no love like ours for a million light years.
To my Worf, you're a Dax; to my Riker, a Troi.
My scanners are reading anomalous joy.
My phasers are ready, my probe is deployed;
I know what you're feeling--I'm your love-slave Betazoid.

Chorus:
It's a Star Trek love song,
It's Warp Love.2.
Across this galaxy,
I Pon-Farr for you.

Your globular clusters are both class 6 types.
Like a Bolian plumber, you clear out my pipes.
Your love leaves me feelin' all spacesick and woozy;
I'm warm for your form like a holodeck floozy.

Chorus

And each time we kiss, it's like the Great Link.
Like a Vulcan mind-meld, you know what I think.
I hope this is more than a 5 year love mission;
My deflector collects all the love that you're dishin'.

Chorus

Thursday, June 16, 2011

Happy Captain Picard Day!

Captain Picard Day was declared on Stardate 47457.1.  Since this translates to approximately June 16th, today the geek community celebrates it.  Enjoy some French wine today but be sure to do so with an English accent.

QX3B4JJRGG2B

Tuesday, June 14, 2011

Geek Cupcakes: The Cupcake is Not a Lie (Portal) and Beholder Cupcakes

Sometimes an ordinary cupcake just won't do.  My family of gaming geeks needed cupcakes that reflected their interests.  So I created two elaborate geek styles to suit them.  For one of these cupcakes, I made small cakes inspired by the black forest cake from Portal.  The cake was a lie but the cupcake is not a lie!  It's more like a half-truth.  I also felt that I needed to pay homage to D&D and Magic The Gathering so I created Beholder Cupcakes  These can be any flavor but are decorated with carefully created faces and eyestalks.

The little Portal cupcakes were baked in 5 oz tins--washed and repurposed evaporated milk cans.  The tiny cherries are cherry jelly beans, sliced in half.  White birthday cake candles are the perfect center decoration.

The beholder cupcakes sport eerie fondant eyes painted with food color and black piping gel.  Notice the discolored teeth and whites of the eyes.  Each has just four eyestalks--enough to give the idea of the beholder eyes.  The full amount would just clutter the little cakes. 

Check out my step-by-step instructions for each of these, including photos, on Instructables:

Thursday, June 9, 2011

An Open Letter of Thanks to JK Rowling

Twelve years ago I received an email from my mother-in-law asking permission to get my oldest daughter a Harry Potter book.  I hadn't heard of Harry Potter but I couldn't imagine my daughter, who was an avid reader, turning down a children's book or why she would need permission to read one.  In her email, my mother-in-law said that the reason she was asking was because the book had generated some controversy.  Controversy?  From a children's book?  Bring it on!  Without batting an eye, I replied that, yes, she should definitely get the book.

After reading it, we learned of the issue to which my mother-in-law had been referring: objections to the presence of magic in Harry's world.  I simply saw Harry as a protagonist to whom my kids could relate.  The idea that his world included magic seemed much less important than that Harry had to find his strength in working to defeat a terrible and relentless enemy.  Best of all, the characters and situations in the books created relevant parallels with the non-fiction world in which my children were living.

The Potter books not only became instant classics in our house but they provided fuel for conversations with our children--points of understanding around which much learning about life occurred.  We referred to the books when helping them wrestle with social quandaries or considering the politics of life.  It became a standing joke that "All I Need to Know in Life I Learned From Harry Potter." The Potter books joined the ranks of other epic stories that were also analogs to real life.

When the first Harry Potter movie came out, we saw it.  It wasn't as close to the book as we had hoped but we didn't mind because it brought the characters and world to life and that was the point.  I refined my meager sewing skills as I copied the costumes from this movie, making school uniforms and Quidditch costumes.  These were worn to book release parties where my kids delightedly won contests: one for her amazing recall of Harry Potter trivia and the other for her appearances as characters from the books.  Our wizard costume collection grew over time as the kids got older and their parents wanted in on the action.

What we are faced with, in the release of the final movie, is not only the bittersweet end of an era but what feels like the end of childhood for my kids who are now at university and secondary school.  It is the closure of a very distinct and well-remembered chapter in our collective lives.

Thank you, JK Rowling, for bringing together my family, giving us something to talk about, and creating a world in which we will always dwell together.  It was amazing to discover the elements of Harry's magical world but it was even more amazing to refer to this world and it's populace while helping our children explore the realities of the one in which we must all dwell.  Your books gave us a means to really connect with our children that has been incredibly helpful and fantastically fun.  You gave us more dinner conversations and "ride home from school" conversations than I can count and, in so doing, kept our kids talking to and confiding in us for the last dozen years.  You are amazing and we owe you so much!

Sunday, June 5, 2011

Geeking Out on Facebook

I decided to play around on Facebook and pay homage to my favorite schools of geek learning.  It turns out that I have classmates who also list these as their alma mater!  Each of these schools already existed in the school lists.  Here is how it looks from my profile:

Sunday, May 22, 2011

Fly Your Freak Flag Day

May 25th is both Towel Day (The Hitchhiker's Guide to the Galaxy) and Geek Pride Day. The Los Angeles City Council declared May 25, 2007 Star Trek Day. It's pretty clear that the day is very special in the hearts of geeks. So fly your "freak flag" and celebrate your favorite icon of geek subculture, whatever it may be.

I declare May 25th to be "Fly Your Freak Flag Day."  So...

  • Wear your favorite Cosplay outfit.
  • Carry your magic wand.
  • Attach a communicator pin to your shirt.
  • Pack your sonic screwdriver in your purse.
  • Bring your Dungeon Master's guide or your graphing calculator manual to work and display it proudly on your desk.
  • Shout "For The Horde!" or "You Shall Not Pass!" randomly and loudly.
  • Establish Reaver drill protocols.
  • Write "Don't Panic" on sticky notes and distribute them everywhere.

It's time to let your inner geek shine!

Monday, May 16, 2011

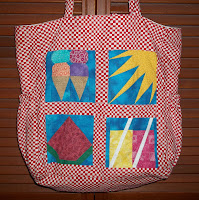
Summer Tote with Quilted Panels

This summer tote was one of my first forays into paper-piecing.  Trying to figure out how to make the designs for each panel appear as I had intended took a lot more work than I expected.

These four panels sat in my sewing stash for a few years after I made them.  One day, I found a piece of red and white checked fabric in a remnants bin.  It reminded me of a picnic table cloth so I bought it, grabbed these summer panels and turned them into this picnic tote, complete with water bottle side pockets.

Saturday, May 7, 2011

Life and a Box of Chocolates

This Mother's Day weekend I thought I would pass on some motherly advice.  When my grandmother was in the hospital, my mother urged me to bring her a box of chocolates.  This seemed a strange request because my grandmother doesn't have much of a sweet tooth.  I learned that Grandma likes to keep the chocolates on hand to offer to doctors, nurses, and other staff who come to her room.  Then she's like their very own grandmother and they go out of their way to check on her, sometimes peeking in even after their shifts have ended.

Friday, May 6, 2011

Roll A D6

This is amazing!

Spicy Mocha Hot Chocolate Cupcakes

These slightly spicy cupcakes were a great Cindo de Mayo dessert.  They have a slight kick thanks to an addition of cinnamon and cayenne pepper.  To create them, I used a boxed chocolate cake mix with a few alterations.  I simply changed and added a few things


I Replaced:
the water called for in the recipe with strong brewed coffee that had been allowed to cool

I Added:
1 teas cinnamon
1/8 teas cayenne pepper
1 teas good vanilla extract

The icing was a ganache frosting made by heating 1/2 cup evaporated milk (until steaming) and pouring  it over 8 oz of chopped semisweet chocolate.  I mixed the chocolate in and whipped it with a mixer.  It was still slightly warm when I frosted the cupcakes and set about 30 minutes after frosting them.

Wednesday, May 4, 2011

Giant Bulletin Board

I made this enormous 12 square foot bulletin board for my story notes.  I used a piece of hard foam insulation, cut to size as the base of the board.  The insulation is rigid, cheap, and will accommodate all of the poke holes that I put into it fairly well.  It would be possible to cover the board with a sheet of cork but I decided to cover it with a large piece of fabric instead.  The fabric was pulled tight and taped to the back using duct tape.

Then I mounted the board, which is extremely light, with two long screws.  Because it is so light and rigid, two screws is all it took.  I slid pieces of hard plastic straws, cut to the depth of the board into holes that I drilled.  Then I added the screws that fit into the straws and were long enough to go into the wall stud.  The straws and the large washers I used prevent the screw heads from from sinking into the foam.


Notes are hung using straight pins rather than pushpins.  Not only are they easier to use but they create smaller holes, extending the life of my foam base.  Although I am using plain steel pins, color-tipped straight pins can be used (or these heads can be dipped into paint) for those who like to color-code their pins and/or notes.

Because the pins stick out from the surface of the board, I can also use thread or ribbon to connect notes into storylines so I can see the various routes taken by my characters and how they intersect on my story map.

I intend to cover the edges of the board and screw heads with some framing material.  However, a different choice of fabric and the deliberate appearance of screws (maybe shorter "dummy screws that don't go through into the wall scattered around the edges) can give this board an industrial look.

Thursday, April 28, 2011

Make Your Own Moisturizing Sugar Scrub


Make your own sugar scrub using ingredients you have at home.  You control the ingredients and can customize it based on your own preferences and/or available materials.  Not only does it exfoliate but it leaves the skin silky soft.  Never pay high prices for commercially produced sugar scrubs again.


You Need:
1/4 cup olive oil*
1/2 cup granulated or brown sugar
essential oils for scent (optional)
herbs (optional)**

*Optional Oils:
sweet almond oil -- replace olive oil entirely or use in place of part of the olive oil
coconut oil -- replace olive oil entirely or use in place of part of the olive oil
jojoba oil -- replace about 1 teas to 1 Tbsp of the olive oil
vitamin E oil -- replace about 1 teas of the olive oil


**Optional Herbs --You can use whatever herbs you'd like or none at all.  Suggestions include:
mint, lavender, chamomile, thyme, rosemary


I suggest making a small batch of plain olive oil sugar scrub and trying it to see what kind of results you get before tinkering with added ingredients.  I find that plain sugar and olive oil works well for me and that the lack of additional scents or herbs makes this scrub usable by the whole family.  It's a fantastic product to use on the hands and arms when getting done working in the garden, shop, or art studio.

In a small bowl, combine oil(s) and sugar.  If using essential oils, add a few drops.  If using herbs, add about 1 teas or so.  Using a spoon, stir together sugar, oils, and optional ingredients.  Place in a small jar with a tight-fitting lid.


If you find a layer of oil on the top of your scrub, just give the jar a shake to mix it in before opening.

To use on Face or Hands
After washing your face or hands, scoop out a marble-sized amount and rub the scrub onto the hands or face.  Massage the scrub into the skin gently.  If applying to face, be careful to avoid your eyes.  Don't rub too vigorously.  Allow the oil to sit for a minute or so and rinse off with warm water.  If you find your skin seems oily after use, wash lightly with soap and water.  If desired, follow-up with your favorite moisturizer for extra softness.

Body Scrub
While showering, scoop a gumball-sized amount out of the jar and gently massage into skin.  Rinse well and use a moisturizing body wash to cleanse the skin.

Sunday, April 24, 2011

Peeps Apocalypse Brownies

I decided to make brownies to go with our lemon pound cake for Easter dessert.  As I mixed the batter, I started to think of how to make the brownies more festive.  I have various kinds of sprinkles and was about to root through my baking things to decide which to use when my thoughts turned to those sugar-sprinkled staples of the American Easter basket: Peeps. I thought they would go well in the brownies.

I considered cutting the Peeps with kitchen shears and pushing pieces into the batter.  I asked my kids if they would donate their Peeps to the cause and my youngest suggested that I shove entire peeps into the batter.  What follows looks like the results of some kind of Peeps Apocalypse.


I used my brownie pan with dividers to great effect.  I mixed the batter and poured it in, as usual.  One Peep went into each section.  Then I submersed the Peeps and popped the brownies into the oven.


The Peeps were doing well after 8 minutes.  Some puffing began to happen.


At 13 minutes, the Peeps continued to swell and were beginning to get a little brown.


After 28 minutes, a few of the Peeps had already reached critical puffing point and had collapsed.


More of the Peeps had collapsed after 32 minutes. Interestingly enough, the brownies in which each deflated Peep had resided appeared done using the toothpick test and the brownie sections in which the Peeps were still puffed were not done.


The pan was removed from the oven at 35 minutes when the center brownies were done and their Peeps had collapsed.


The reviews were that these were really good!  The tops of the Peeps browned just a little bit giving them a slightly toasted taste.